Showing posts with label watercolor pencils. Show all posts

Thursday, March 5, 2015

Love is All You Need with Maja Design

Hello Maja fans!

I'm in today to share a card I created using the gorgeous Nyhavn collection. It's a quick card that uses just one sheet of patterned paper. It's so simple, you can apply the same tips to any card or project if you don't have the entire day for crafting.

Here is my card:


For this card, I've used both sides of the "Romantic Lunch" sheet of paper. What I did was to use the neutral grey side as a base for the card, and layered it with the patterned and colored reverse side. It is from this colored side that I drew the colors for the chipboards, embellishments and background. 

Some close-ups:


I have two chipboard designs here - the smaller flourish I left nude because there was already enough color on the card. The second chipboard with more flourishes and flowers was colored with Inktense color pencils, and bled with a small wet brush. I also distressed the edges of my layered paper with black paint using my finger. 


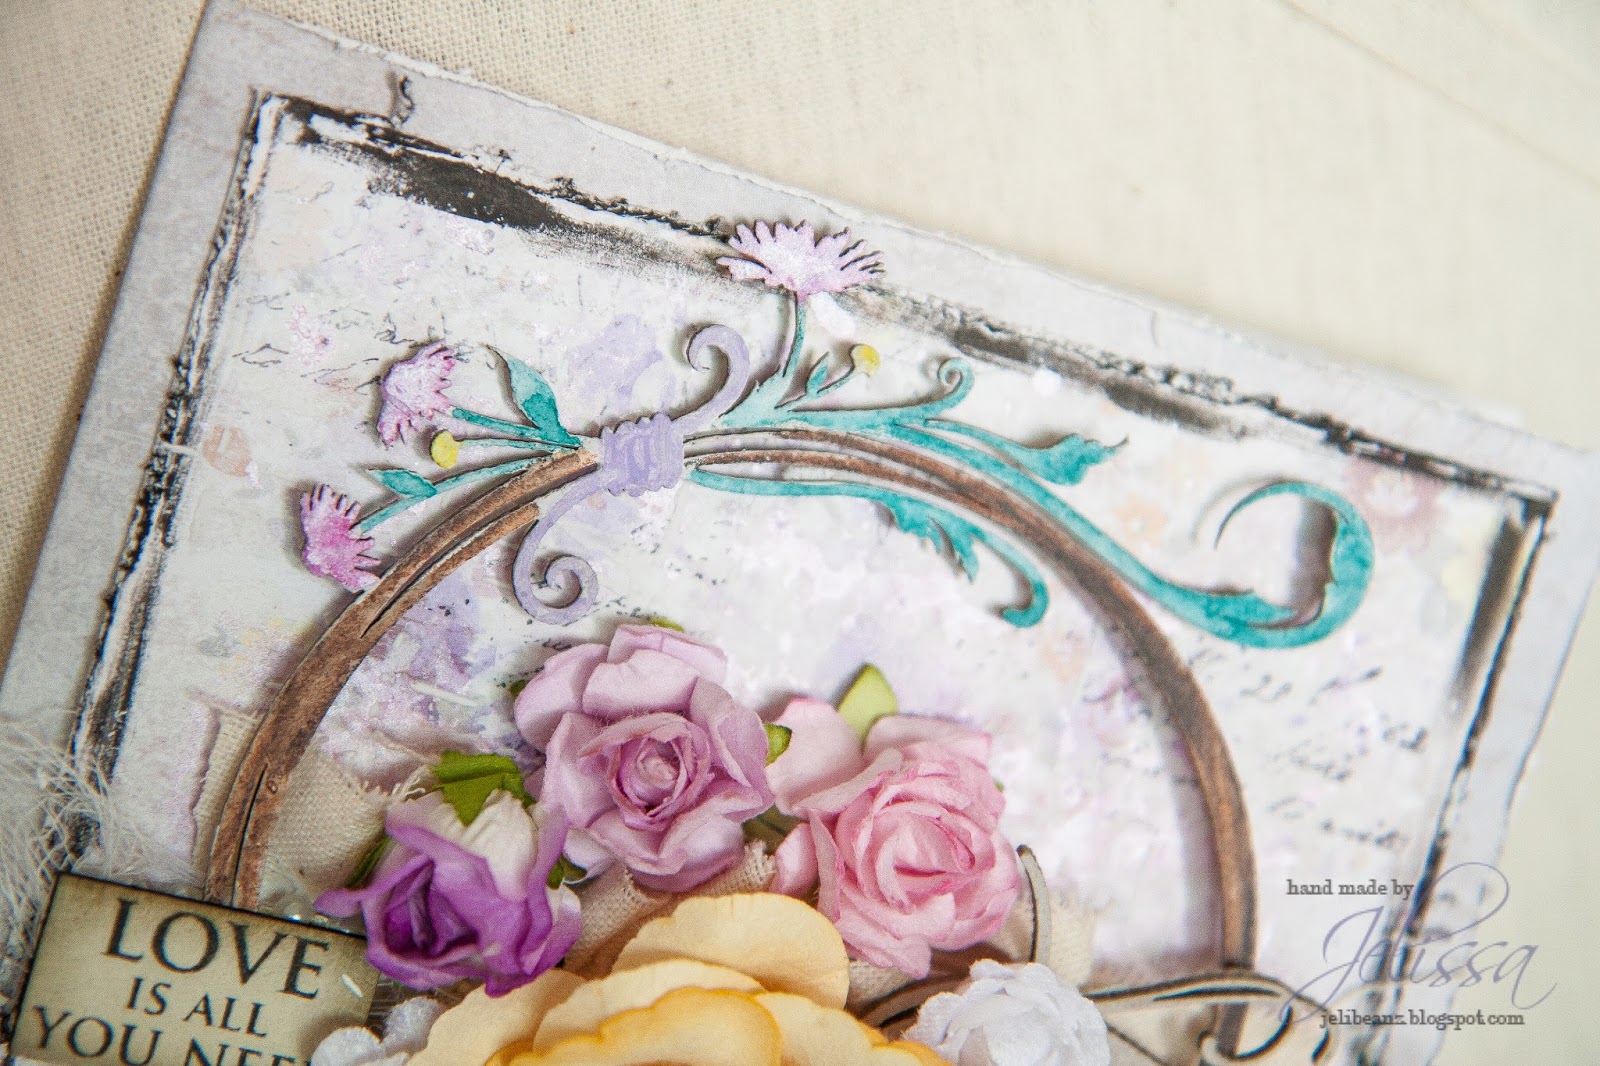
While the colored side of "Romantic Lunch" already has a beautiful palette, more details can be added. I patted on gesso randomly, followed by mists in various purples and pinks. The effect is a subtle yet vibrant background.

To add the last few touches, I had a canvas frill with pearl strings running under my floral cluster. 

And this is all I have for today. Thank you for dropping by, and have a good day ahead!


Monday, March 2, 2015

Always and Forever with Blue Fern Studios

Hello friends!

How is your Monday? I'm home with a sick child but having fun doing some craft work with him. Today, I have a reverse canvas tutorial for Blue Fern Studios that I would like to share with you. It's created with the stunning new "Love Story" collection and I used some of the gorgeous chippies from BFS as well.

Here is the canvas:


Lots of fussy cutting and layering, which I felt was a good way to bring out the loveliness of this collection.

Some close-ups:


Popping up my elements for dimension and sneaking in the Floral Medley chipboard in between. I'm also very into canvas frills after I found a huge bargain pack for only $2 at the local textile district. Told myself that I must find the time for such bargain hunts in the heart of the city.


Tucking in flowers to fill out the space, and dotting the background with bling.


My title piece from "calling cards". I did a lot less alteration on my flowers this time round, preferring to let the colors from the papers take the limelight.

And here is the start to finish video for this reverse canvas. Hope you enjoy it!


And a new month also means a new sketch challenge at BFS. Here is this month's inspirational sketch by Michele Singh:


Do remember to check out the blog for the DT's amazing takes on it! That's all I have for today, have a blessed week ahead!

love, 


Sunday, December 14, 2014

Easy Watercolor Christmas card for Off the Rails Scrapbooking

Hello friends!

How is your preparation for Christmas coming along? We are doing a lot of last minute gift shopping for the kids and their friends, as well as scouring the internet for yummy recipes that help this mummy look like a fabulous chef during parties.

Today I'm up on the OTRS blog with a easy card for you, along with a step by step tutorial on how I created it.

The card is based on our December moodboard:


As you can see, I'm a very pastel person so I've used the softer versions of the colors in the mood board.

Step 1:

Prime your white cardstock with gesso. Pick out the watercolor pencils that you will be using. Next, trace out the shapes on your stencil and shade in the colors. Lastly, using a small brush, add water to paint. It's ok to let the colors bleed out and blend.


Step 2:

Take the red water color pencil and trace out small triangles from another stencil. Repeat with the bleeding and blending with a small wet brush.


Step 3:

Using the Ranger's embossing pen (black or white is fine), trace out the red triangles and sprinkle black embossing powder. Heat to set.


Step 4:

Stamp around the edges with a border stamp (I used one with a lot of triangles) and adhere the cardstock on to a sheet of patterned paper. Then I made my title with a some Christmas title dies from Sizzix. To finish off, I altered a snowflake chipboard with some Shimmerz Texturez and sprinkled gold glitter on the edges while it was still wet.


And here it is, my easy-peasy Christmas card! Hope you found the techniques here useful!