Showing posts with label Marion Smith Designs. Show all posts

Thursday, December 18, 2014

Quick Card for Marion Smith Designs

Hi everyone!

Have you been busy like Santa's little elf preparing for Christmas? I've been spending my time catching up with assignments, Christmas shopping and gift wrapping, baking and sending out stuff to people! So today, I have a small card for Marion Smith Designs that I would like to share with you.


I've used papers from the Posh and Garment District collections for this card, and embellished it with the resin flowers from Junque and Gems.


Adding dabs of gesso for a distressed look, and some Ayeeda matt paint in green on the ivory resin rose for some color.


A rose cabochon which I really like, tucked under a paper flower from my stash. The black doily was also die cut using one of the sheets from Garment District.

That's all I have for you today. Thank you for dropping by!


love,

Thursday, November 6, 2014

My Boy for Marion Smith Designs

Hello friends!

It's my turn today on the Marion Smith blog and I'm excited to be showing you a project I've created with the new Posh collection, together with some older paper lines as well.

Here's the layout I've created:


I've mixed the old and new here: Posh together with a bit of Nirvana and Garment District and I love how the papers match up. My background was created with some of the new paints I got from 13arts and I think my new favourite (other than Gold) is Berry! 

Some closeups:


A little cluster I created with a cut-out from Garment District, Junque and Gems resin flower, a metal gear and jeweled key. 


My floral cluster with some Prima roses and also more Junque and Gems goodies - a silver metal gear which I primed with gesso and painted with my (you guessed it...) beloved Pearl Gold paint.

That's all I have for today. Do drop by the Marion Smith Designs blog for more inspiration from the wonderful DT!

 love,

Thursday, October 23, 2014

Quick Tag for Marion Smith Designs

Hello friends!

It's been a crazy, crazy week with both the boys and me sick. But I managed to make a really quick and simple mixed media tag with some gorgeous Marion Smith Designs products.


Many of us end up with odd-sized papers after projects and I like to keep those because you never know when they come in handy. So I managed to steal about 30 min of craft time and use up some of those scraps.

To make this tag, I used papers I have from the Up and Away sheet from the Nirvana collection, as well as some bits left from Mad Tea Party. I took the Up and Away sheet and adhered it onto a product packaging as a backing and trimmed for a tag shape. Next was to tear some strips off the Alice paper from Mad Tea Party and layer them. I also cut out the floral basket from the same piece of Alice paper and did more layering with a cardstock doily and chipboard. 


The white cabbage rose resin from Junque and Gems. Love that they come in white so that I can paint them. A tip to share: the surface of this particular resin is very smooth and doesn't hold paint well, so I primed it with gesso before proceeding. After that, the 13arts matt paint and Silk Acrylic I used for coloring stayed on beautifully. I also tucked in a piece of Tattered Diamonds chipboard from Blue Fern Studios as the Alice paper in my layers had repeating diamond motifs. 


The floral basket which I fussy cut out, and you can see the repeating diamond motif which I borrowed from the Alice paper. 

That's all I have for you today. Thanks for dropping by and have a great weekend!

 love,

Thursday, October 9, 2014

Color Splash Fun for Marion Smith Designs

Hello friends!

I'm up on the Marion Smith Designs blog today to share a layout I created using the Mad Tea Party collection.


That's a photo of eldest playing with bubbles and I have edited the photo for a saturated look. Using my 13arts mediums and some Twinkling H2Os, I created a colourful background to match the tones in the photo. 

Some close-ups: 


A balloon stamp from the Flying High stamp set. I misted the stamp and pressed it down on a scrap piece from the Garment District papers. Then it doing the outline in black with a Faber-Castell Big Brush pen to get more defined lines, and stamping it over the first image. This was followed by some masking and misting, and more stamping with a small motif stamp from the same set. The little metal balloon is also from Junque and Gems.


A white resin flower which I misted with Ayeeda Chalk mist to give it a peach tinge. I also built up layers under my photo using cut-outs from the Cut and Create sheet, also from the Mad Tea Party collection. Tucked under that, and also my title are some chipboard pieces from Blue Fern Studios (Ups and Downs Panel, and Chunky Words)

And that's all I have for today. Thanks for dropping by!

love,

Thursday, September 25, 2014

Mixed Media canvas for Marion Smith Designs

Hi there friends!

Today I'm up on the Marion Smith Designs blog today with a mixed media canvas I created using MSD stamps, Garment District papers and also Junque and Gems embellishments.

Here's the canvas:


My background was created with a lovely blend of 13arts chalk mist, Inklingz and Silk acrylics. And I've combined two different small stamp modules from the Curios Stamp set and used them as a repeating motif in my background.

And some close-ups:


A fussy-cut doll from Mad Tea Party


Junque and Gems goodies. I've also dabbed some liquid pearls to accent my stamped images.


A lovely flower from Curios stamp set which is the centre piece of the canvas. Had so much fun layering the colors!

And here's the start to finish video of how I put this canvas together:


And that's all I have for today, thanks for dropping by!

love,

Thursday, September 11, 2014

Close to My Heart for Marion Smith Designs

Good day lovely friends!

I have for you today, a layout I created with the Nirvana collection by Marion Smith Designs. I just love the teals and the golds and browns in the collection and together, they make such a rustic and shabby combination.

I did lots of layering with different papers from the collection for my photo mat, plus lots of stamping and playing around with Ayeeda liquid medium, mists, gold paint and also my new toy the Luminarte Silk Acrylics.

Some close ups:


Stamping little hearts with one of the MSD stamps and coloring it with a mixture of Silks and Ayeeda liquid medium. The liquid medium is now my favourite go-to other than clear gesso. It gives so much body and fluidity to any paint or pigment and I absolutely have to use it for everything I paint with now! The flowers I fussy cut out were also covered with a layer of gold glaze, and the resin flower (also from MSD) was painted with Ayeeda Gold Pearl paint. 


Layered amongst the Nirvana papers are also some chipboards from Blue Fern Studios. I am in love with the effect I've created here and I will be showing you how to create this super grungy look in a video tutorial soon. 


You would have noticed little gold arrows everywhere? These are from MSD's Junque and Gems embellishment lines and these little arrows are perfect for creating movement, and directing the focus onto your photos or your clusters. You can also see n the background I've used MSD stamps all over. 

That's all I have for you today. Thank you for dropping by and remember to check out the rest of the DT's fabulous work on the MSD blog.

Until then,
happy scrapping!


Thursday, August 28, 2014

Altered picnic basket with Marion Smith Designs

Hello friends!

I'm in today to share a small altered project I created for Marion Smith Designs. Usually altered stuff are not my thing but MSD products are so suitable for them, I had a lot of fun making this picnic basket.


What better collection to use than the Mad Tea Party eh? I used the papers and metal embellishments from this line, together with some bits from the Garment District 6x6 paper pad. 

Some closeups: 


Handmade flowers with the Bloom Impressions Tool and an altered metal butterfly.


Floral sprays made from MSD flower stamens. Love that they come in teal!

And here's a video of how I put the whole project together. Sit back and enjoy, and remember to hop over to the MSD blog for a whole list of supplies used.


love,

Thursday, August 14, 2014

A Mini Album for Marion Smith Designs

Good day nice people!

I rarely make mini albums because I'm not particularly good at them. But when myprize pack of Um Wow Studios goodies won at Scrap Around the World came, there were these cute little mini albums just screaming out and begging to be altered. So I picked out some of my favourite lines from Marion Smith Designs and tried to work some magic up.

Journey Mini Album


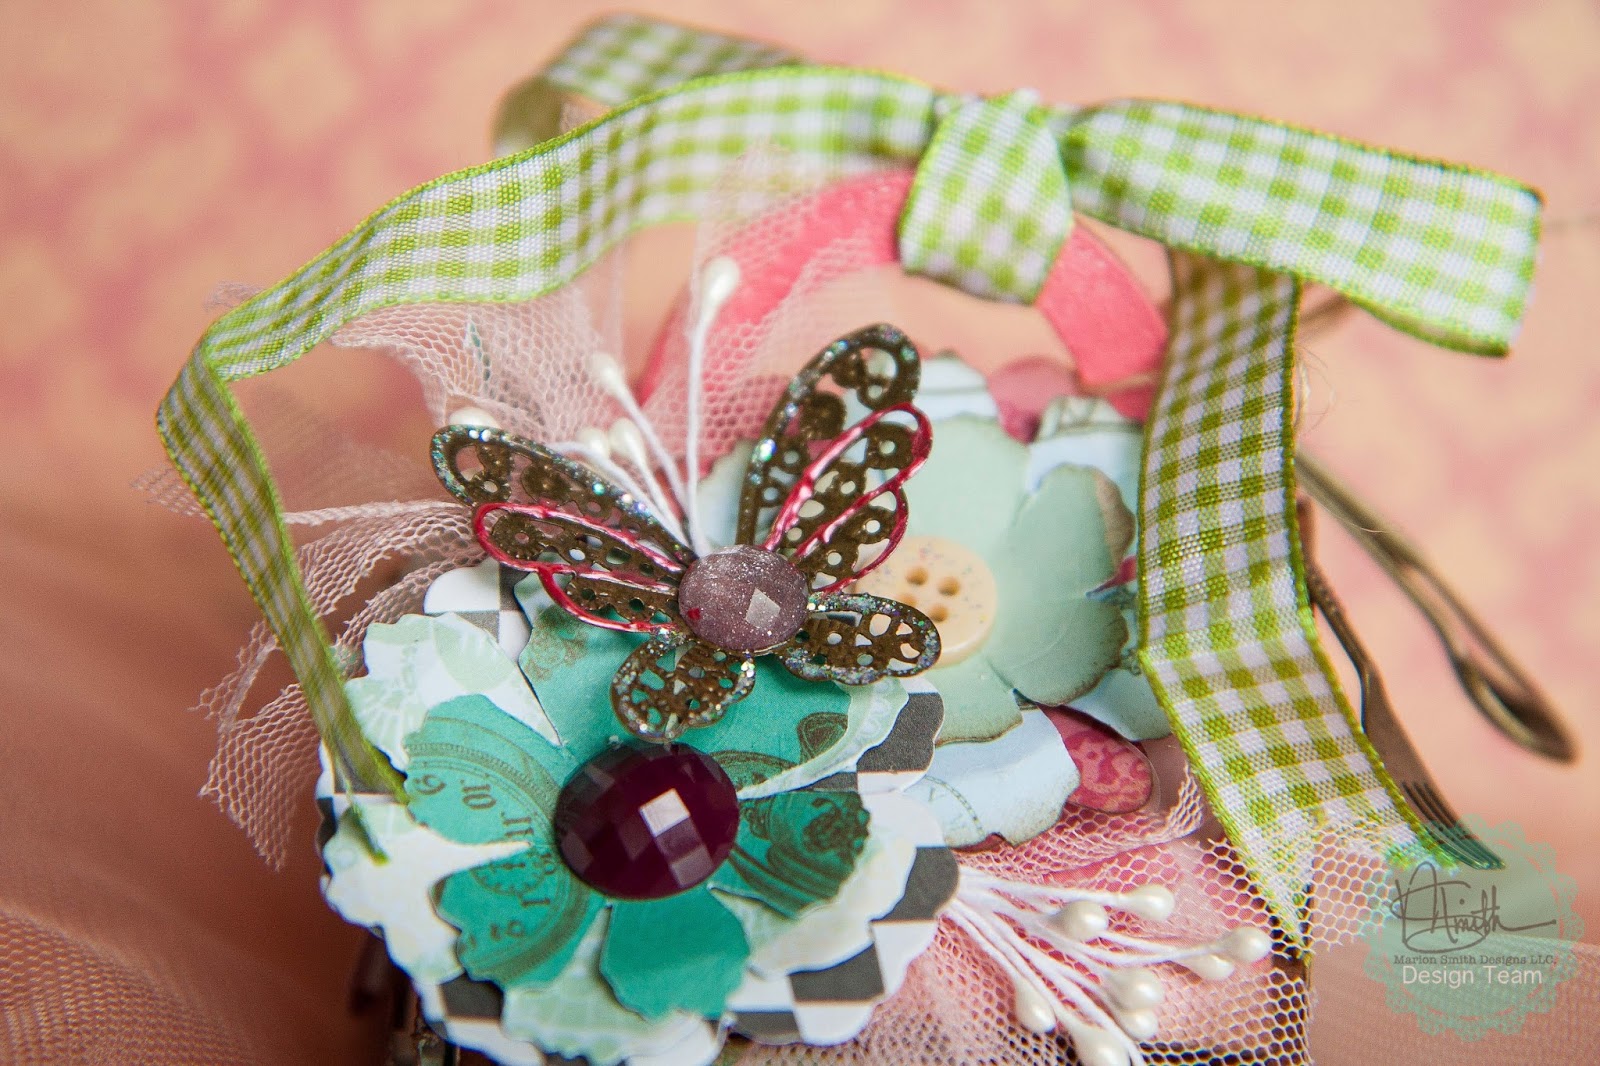
This is the cover where I've used mostly papers from Nirvana, layering my cut-outs and popping them up for a 3-dimensional effect. I die cut the flowers from Garment District papers and shaped them for a more gentle contour using the Bloom Impressions Tool. Jazzing up the flower are the new MSD stamens and a piece of bling from Junque and Gems. I put in a little bit of texture with some 13@rts acrylic modeling paste over one of their stencils to fill out the space. There is also a piece from the Petite Frames set from Blue Fern Studios which I've tucked under the balloon and used it to secure my trim. For that, I've covered it with some Shimmerz Dazzlerz.


Some tips I found useful:

1. Your cover can be as layered or as three-dimensional or as cluttered as you like. But remember to do the reverse side first if you're going to make it chunky, as it can be little tricky if you can't lay the base of the album page flat on your work space.

2. I usually try not (but tend to forget) to clutter the pages in the mini-album or make it too chunky, but you can always make each page more interesting by using accents. I used cut-outs from Garment District to spruce up each page and the 6x6 pad size is just perfect for a mini.

3. Instead of adhering them flat on the page, layer different accents (I used up to 3 layers) and pop up the topmost one using the thinnest 3D foam dots so that the album can still close nicely. Don't forget you typically have a few pages in one mini album so the trick is not to overdo the 3D effect for each page.

4. It's ok to have bits sticking out of your pages - not everything must fit. I do this a lot as I like the "messy" and "out of the box" effect it creates.


Finally, here's a look at the inside pages of the mini and you can see the above tips in action.


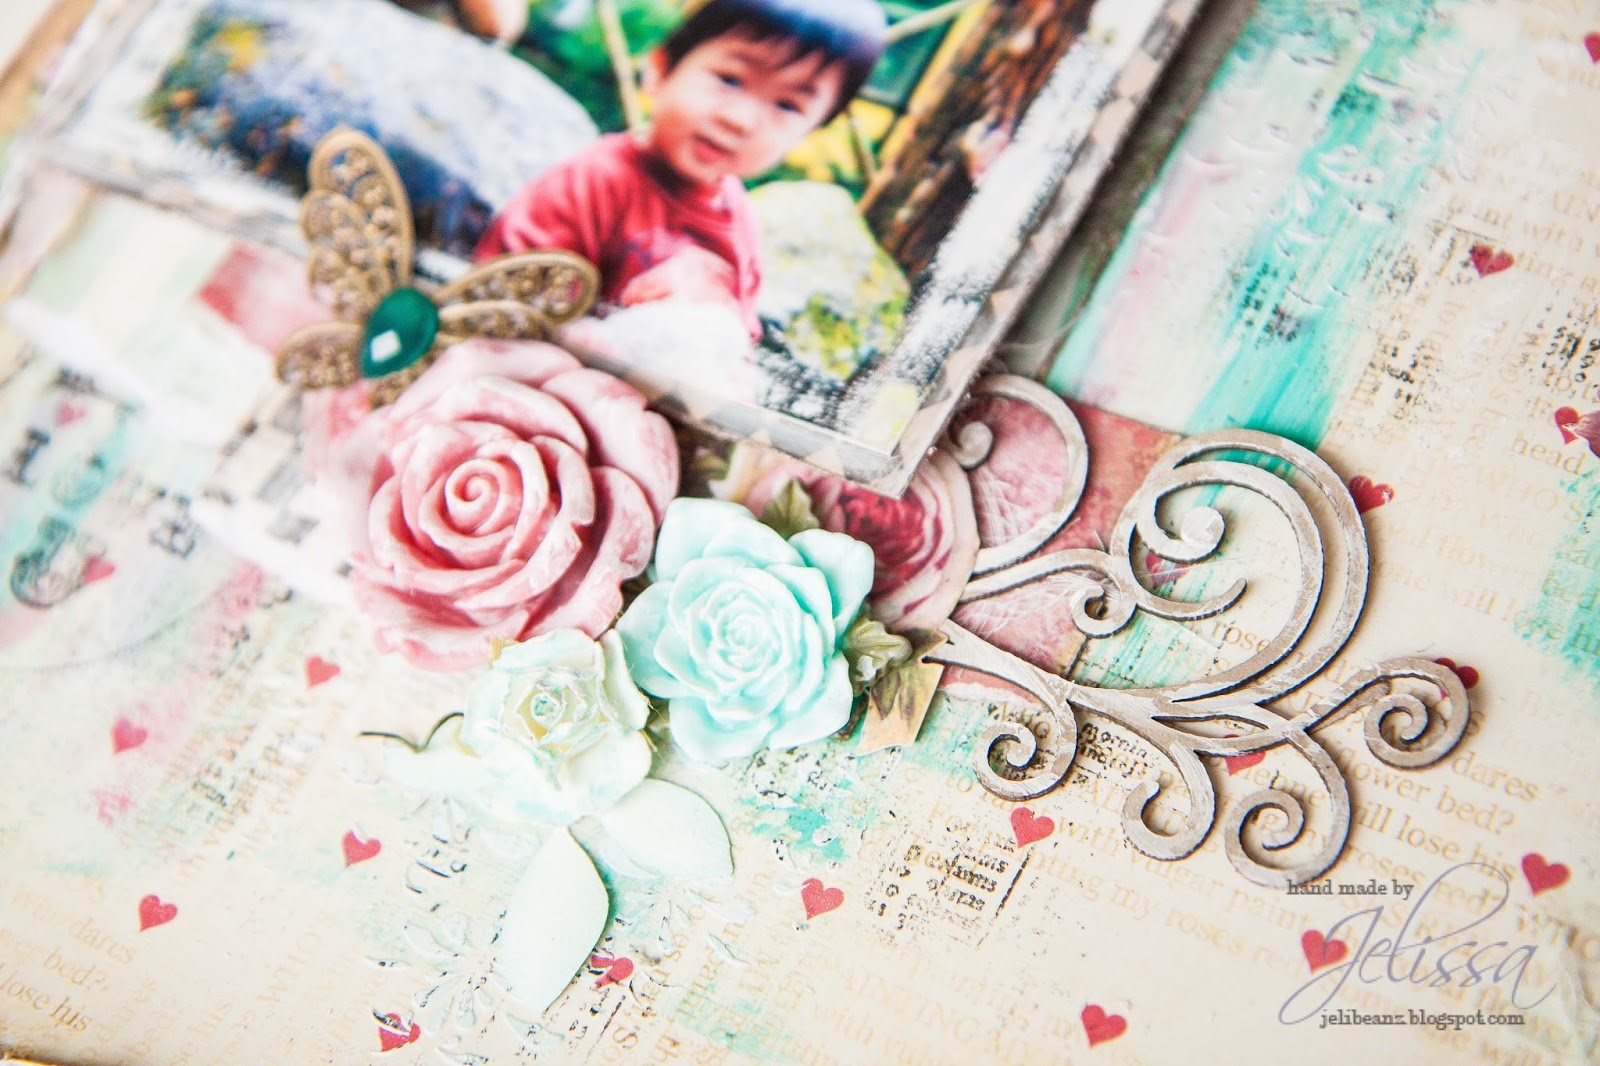
One of the pages feature the "Blue Fern frame" from BFS as well. I painted it with Ayeeda's matte paint (Pink) and also Pearl Mist (Sap Green). 

For the back cover, I used the MSD Stamp and randomly went over the patterned paper. The rose was fussy cut out, and I used my finger to spread some Stickles over the petals for a shimmery effect. I also tied one of the Junque and Gems monocle pieces to my twine. Inside is a motif I cut out from Garment District.


And that's all for today. Thanks for dropping by!

love,


Friday, August 8, 2014

Debut post with Marion Smith Designs

Hello friends!

Today I'm bringing to you my very first post for Marion Smith Designs. It's been awhile since I've created with such amazing artwork and detailed papers so it was definitely a lot of fun!

"You Make Me Smile"


This was created using papers from the "Mad Tea Party" collection. Just love the amazingly rich colours and different designs that I can fussy-cut out for layering. 

For my background, it was the usual acrylic primer from 13@rts, followed by dry brushing with Ayeeda Matte Paints in Turquoise and Raspberry. I then wet my brush a little and bleed the colors randomly. Next was some acrylic modeling paste over a stencil, and finished up with some random stamping with MSD clear stamps.

some close ups:


I actually made those flowers with the new Bloom Impressions Tool and it was so much fun! So very different from the pre-made flowers that I'm used to but it has definitely added a lot of dimension to my layout. Plus I can add matching Junque and Gems stuff to jazz up the flowers. Now I'm just working with patterned paper but I'll be trying out fabric real soon. As you can see, lots of fussy cutting and layering the different pieces.


Junque and Gems resin flowers, jewel and a metal butterfly. I also added a flourish chipboard from Blue Fern Studios which I lightly dabbed with acrylic primer randomly. 

So that's all I have for now. Hope you've enjoyed my project for today.
Until then, happy scrapping!

love,