Tuesday, December 30, 2014

Just Perfect for Made With Love

Hi there friends!

I'm in today to share a canvas I created for my LSS Made With Love.


I'm so in love with the Rustic Harmony collection from Kaisercraft that I have used it again here in my paper layers. My background is just a very simple mix of Tattered Angels Glimmer Mists in Coral and Cadillac Pink, over a brick stenciled with the Bone Dimensional Medium from Art Anthology. All these products are available from the 313 Somerset store. 

Now, some closeups:


My floral cluster over a Blue Fern Studios chipboard. I'm SO glad that the store is finally bringing in BFS products! This was colored with Coral glimmer mists and Ranger's Distress Paint in Victorian Velvet. And lastly a coat of Prima's soft matte gel with a sprinkle of art sugar. 


Another floral cluster here with a resin angel, also from Prima. 

That's all I have for you today. Thank you for dropping by!

love,

Saturday, December 27, 2014

Wedding Canvas for 13@rts

Good Saturday friends! Hope everyone had a wonderful Christmas holiday!
Mine was full of eating and drinking and laughter, and I think I might have over-eaten a little....

Today I'm back in on the 13@rts blog to share a wedding canvas I made for an ex-colleague who married the man of her dreams. I've used the Wedding Day Kit from the 13@rts store and it's filled with soft pastel shades of pink, grey and green.


Some close-ups:


One of the sheets from the kit was filled with lovely quotes and I used it as the sentiment of the canvas. 


Underneath all the paper layers (all from kit), I used the lace that came in the embellishment pack and layered it over my background of masked acrylic modeling paste and some misting with the Pink Pastel Mist (kit) and Antique Cream Mist (own).


These gorgeous flowers, beaded stamens and pearl string are found in the kit and they add the perfect romantic touch to the canvas with the soft tulle texture and colors. 

That's all I have for you today and thank you for dropping by. From our family to yours, have a Happy New Year! 

love,

Thursday, December 18, 2014

Quick Card for Marion Smith Designs

Hi everyone!

Have you been busy like Santa's little elf preparing for Christmas? I've been spending my time catching up with assignments, Christmas shopping and gift wrapping, baking and sending out stuff to people! So today, I have a small card for Marion Smith Designs that I would like to share with you.


I've used papers from the Posh and Garment District collections for this card, and embellished it with the resin flowers from Junque and Gems.


Adding dabs of gesso for a distressed look, and some Ayeeda matt paint in green on the ivory resin rose for some color.


A rose cabochon which I really like, tucked under a paper flower from my stash. The black doily was also die cut using one of the sheets from Garment District.

That's all I have for you today. Thank you for dropping by!


love,

Sunday, December 14, 2014

December Challenge with 13@rts

Hi everyone! Today's a busy day with a second post for 13@rts. It's time for another challenge and my beautiful and talented friend Melenia is hosing this month's challenge.

Here is her photo inspiration and challenge rules:

Melenia with you today, hosting the December Challenge!
I was thinking about my turn to host a 13@rts Challenge the other day, and as we are well into the winter (the Northern Hemisphere), yarn was the first thing that came up to my mind!

The challenge is based on yarn and specifically this photo:


The criteria of the challenge are the following:

1. Use the photo as your inspiration, which can come from anything in the photo, e.g. colours, texture, theme etc - there are no restrictions as to this).
2. Use a mask (or more)
3. Use modelling paste

Rules of the challenge # 25:


1. Create a project based on the photo of the challenge (as it was mentioned before, inspiration can come from anything in the photo, colours, texture, theme etc).
2. Publish your project on your blog and add link directly to the post using Inlinkz tool at the right side bar.
3. Please add link and info about our challenge, where your work is published.
4. You may submit as many entries as you like. 
5. You can enter with your project to maximum 2 other challenges and your work must be new, not published before our challenge has started. 
6. The challenge ends on December 28th at 23:55. Winners will be announced on January 1st, 2015. 

When the challenge ends, our Design Team will vote and pick the best project. It will be awarded with shopping voucher for 13 arts store worth - 60 PLN with free international shipping. The winner will be invited to join us in one of our challenges as Guest Designers. Additionally we will feature few works with biggest number of points.

Here is my project based on this challenge:


I love the grey tones of the photo, as well as the warm earthy colors of beige and brown. It all reminded me of our visit to Rockingham in Perth and the sunny but cool winter's day spent by the beach. So I picked out papers from the "Cozy Evening" collection for my background, and the colored ones from Olga Heldwein's Color Basic collection for my photo paper layers.
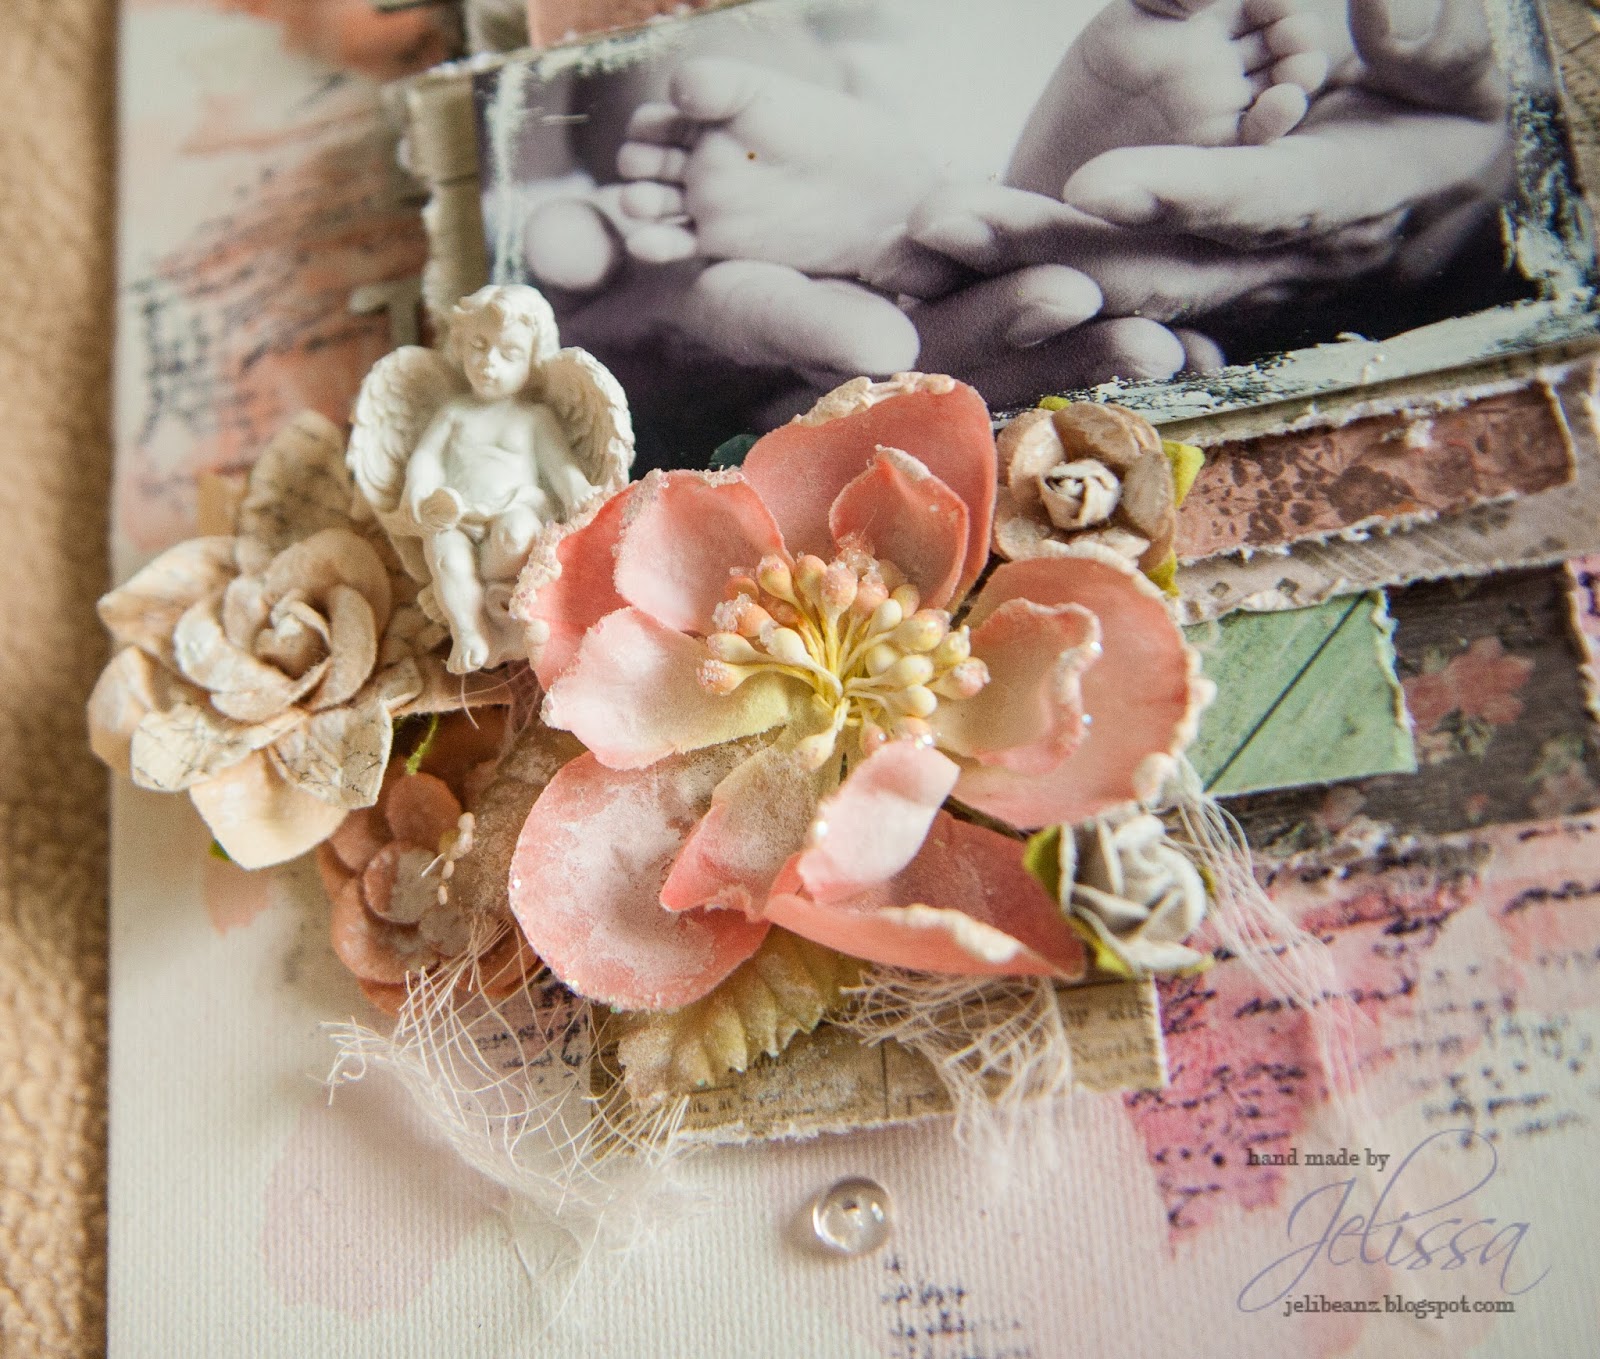
Some close-ups:


Lots of string, yarn, cloth used here. My background was created with lots of 13@rts mediums - Ayeeda mists in Brown, Dark Brown and Antique Cream. I also wanted some grey but realized I didn't have any in my stash, so I mixed Ayeeda Matte paint in Black and White Chalk Mist. I also used the branches stencil from the "Cozy Evening" collection together with Ayeeda modeling paste. Finally, I finished up the layout with splatters of Olga's Splash! acrylic ink in white.


I used chipboards from Blue Fern Studios - the Memory Frames and also a piece from the Graduated Squares to frame my photos. The Memory Frame and Graduated Square were given a coat of gesso and inked with grey chalk ink.


The Crossing the Lines chipboard was used as a base for my photo layers and was given a coat of gesso, followed by a yummy mixture of Antique Cream mist with liquid medium for both color and dimension. 

And this is my last post for today. Thank you for dropping by, and please also go by the 13arts blog for more inspiration from the DT. Have a great week ahead!

love,


Easy Watercolor Christmas card for Off the Rails Scrapbooking

Hello friends!

How is your preparation for Christmas coming along? We are doing a lot of last minute gift shopping for the kids and their friends, as well as scouring the internet for yummy recipes that help this mummy look like a fabulous chef during parties.

Today I'm up on the OTRS blog with a easy card for you, along with a step by step tutorial on how I created it.

The card is based on our December moodboard:


As you can see, I'm a very pastel person so I've used the softer versions of the colors in the mood board.

Step 1:

Prime your white cardstock with gesso. Pick out the watercolor pencils that you will be using. Next, trace out the shapes on your stencil and shade in the colors. Lastly, using a small brush, add water to paint. It's ok to let the colors bleed out and blend.


Step 2:

Take the red water color pencil and trace out small triangles from another stencil. Repeat with the bleeding and blending with a small wet brush.


Step 3:

Using the Ranger's embossing pen (black or white is fine), trace out the red triangles and sprinkle black embossing powder. Heat to set.


Step 4:

Stamp around the edges with a border stamp (I used one with a lot of triangles) and adhere the cardstock on to a sheet of patterned paper. Then I made my title with a some Christmas title dies from Sizzix. To finish off, I altered a snowflake chipboard with some Shimmerz Texturez and sprinkled gold glitter on the edges while it was still wet.


And here it is, my easy-peasy Christmas card! Hope you found the techniques here useful!


Thursday, December 4, 2014

This is Life - a special project for Once Upon A Sketch with 13arts

Hello everyone!

How was your first week of December so far? I'm just absolutely stoked because it's nearly the end of 2014 and new adventures beckon in 2015.

But first, let me share a special project with you, created for the final sketch at Once Upon a Sketch, using beautiful mixed media products from 13arts. As you may all know, our beloved leader Nadia is closing the challenge blog next year and it is indeed a sad time for everyone. OUAS holds a special place in my heart as one of the first few challenges I took part in, won something and even got on the DT. Working alongside so many talented people have taught me much and I've made many friends along the way. So here's a special project as my way of saying goodbye.

This is the sketch:


And journaling theme:
Journalling Theme: "It's December..." 

You are free to interpret our theme ANY WAY you like. It is for your inspiration and this theme word DOES NOT need to be part of your title or journalling. But please make sure your layout is based on the sketch below and includes journalling (hidden journalling is fine). Acceptable journalling is MORE than just a sentence, or generic writing such as date/place etc. It needs to be present and at least 3 lines long. Remember, hidden journalling (under a photo/tag or behind your page) is perfectly fine but please DO let us know in your post where your journalling is! 

And my take on the sketch and theme:


Here at the equator, all we get in December is rain. Lots and lots of rain. And wonderful monsoon winds that brings a respite to the hot humid weather we get for the rest of the year. With rain comes puddles. And with puddles... well there's no way you can stop a kid (or a young-at-heart adult) jumping into one of those and making a splash.

December is also a time when I cuddle up (because it's cold and windy) and start to take stock of the year that has passed, to reflect on how I have lived my life the past 12 months. If any time is a good time to come up with "emo" philosophical metaphysical life quotes, December is the time to do it LOL

My journaling (on the back page) reads:

"December. A time of rain, a time of reflections. Jumping into puddles, making a splash. In this year that has past, I hope I have made some splashes, had some fun and made ripples that would result in small but meaningful changes to other people's lives."

Here are some close-ups:


The layout was created with tons of 13arts products, which I absolutely love. Featured are the new metallic paints by Olga Heldwin, the new mist colors as well and the new paper collection Cozy Evening by my boss Aida. Tucked in between the layers are also the Splattered Circles chipboards from Blue Fern Studios. It was such a joy making this and provided the art therapy that I sorely needed.

And lastly, a start-to-finish video of how I made this layout:


That's all I have for today. Thank you for dropping by. If you have the time, please go by the Once Upon A Sketch blog to leave your farewells and wishes for Nadia and the rest of the team.

love,

Tuesday, December 2, 2014

Once Upon A Time for Blue Fern Studios

Hi friends!

Yes, I'm in again and you will be seeing more of me this week. It's a little like playing catch-up after being away for awhile.

Today I'm up on the Blue Fern Studios blog with a video tutorial for you. And I'm so excited about this one because it features the amazing new paper collection Sanctuary by our new designer Manuela Zimmerman. If you're a fan of shabby romantic papers like me, you must hoard this collection NOW.

So I found this beautiful winter scenery photo while searching for inspiration on Pinterest (it's December after all) and it is just perfect for the dark pensive tones of the Sanctuary papers. This collection may seem nature-themed, but I found it to be perfect for my winter layout as well. That's how versatile it is!

Here's the project:


And some close-ups:


Love those chipboards! I've used Holiday Vine (snipped into 3 pieces and tucked everywhere), Shabby Flakes and Winter Trees. 


Making my own snow here - it's so much fun :D

This layout differs from my usual style in that, I didn't have too much going on in the background - just simple masking, embossing and light touches of color here and there. The photo conveys such a feeling of magic and enchantment - like a moment suspended in time in a fairy tale (hence the title) - and I wanted to preserve that feel by building all the attention around it in the paper layers and keeping the background tame. It feels like any time now, Lucy is going to walk out of the woods and meet Mr Tumnus for the first time by the snow-covered lamp-post (nerd alert: I'm talking about The Lion, The Witch and the Wardrobe).

And here's the video of how I created this layout:


Don't forget, every month Blue Fern Studios has a sketch challenge going on. Here is this month's sketch by Michelle Singh:


So gorgeous isn't it? I'm so inspired I'll be using it for some of my other DT projects as well. 

That's all I have for you now. Meanwhile, happy crafting!

love,


Monday, December 1, 2014

A Wintry Layout for Off The Rails Scrapbooking

Hello folks!

I've been away for nearly 2 weeks now, hope I'm being missed! It was quite a roller coaster ride with my youngest going into hospital while hubby was away, and some awful drama at home which has not seen the worst of it. On top of that, my precious MacBook died on me - which means no photo-editing, no video-editing and well basically, I was severely handicapped. My lovely DT coordinators were kind enough to let me take the time off, and that coincided with the youngest going into hospital. But now that the MacBook is fixed, everything is back to normal!

Off The Rails Scrapbooking has TWO fantastic moodboards for this month's challenge. Being the non-Christmas project person that I am, I chose the wintry colours instead of the Christmassy ones.


(edited to add)

After this post was published, I saw the moodboard over at Scrap Around the World and what do you know, it actually matches theirs as well! So I'm entering this project for the challenge over there too. Even the red was a match LOL. And this below is their moodboard:


And here is my take:


Going for a minimalist watercolor look here with gorgeous Ayeeda paints and mists. 


Silver glitter paint from 13arts! Love how I can actually paint glitter on stuff now. And the "red" splatters are actually Metallic Pink paint from 13arts, mixed with liquid medium for a dimensional finish.


Gold glitter to accent my snowflakes and UTEE masking in the background. Tucked under my snowflake is Mini Ring Things chipboard from Blue Fern Studios, which I sprinkled gold glitter on as well. Paper layers are created with the fun Color Basics collection, also from 13arts.

That's all I have for today. Remember to hop over to the OTRS blog and find out how you can link up your project and win a fabulous prize.  Also, I'll be back tomorrow with my video post for Blue Fern Studios featuring the gorgeous new paper collection Sanctuary.  

Stay tuned!