Showing posts with label Blue Fern Studios. Show all posts

Monday, May 15, 2017

Family with Made With Love

Hello friends! What a wet Monday in May! It's supposed to be all bright and hot and sunny in Singapore now but the weather's been so funny. Well, can't complain because I love cool weather.

In fact, that was what we had on our trip to Melbourne last spring - albeit too cold for comfort. But oh, so many wonderful memories and today, I've finally scrapped our family photo from that trip for my DT project for Made With Love.


Family photos go on display on the counter by the main door, so it has to be something really sturdy. I used an IKEA photo frame as a base, and the rest of the supplies are from the awesome kit that Aida packed for me. And the kit has all my favourite Blue Fern Studio goodies! Although I have left their DT after 3 wonderful years, BFS products always get my mojo going - and the best is they are available from Made With Love - in Singapore!

For the picture frame, I prepped it with Dina Wakely's white gesso followed by grit paste from Ranger's. This added to the beach/ocean feel that I wanted to create in the project.

More details in the close-ups:
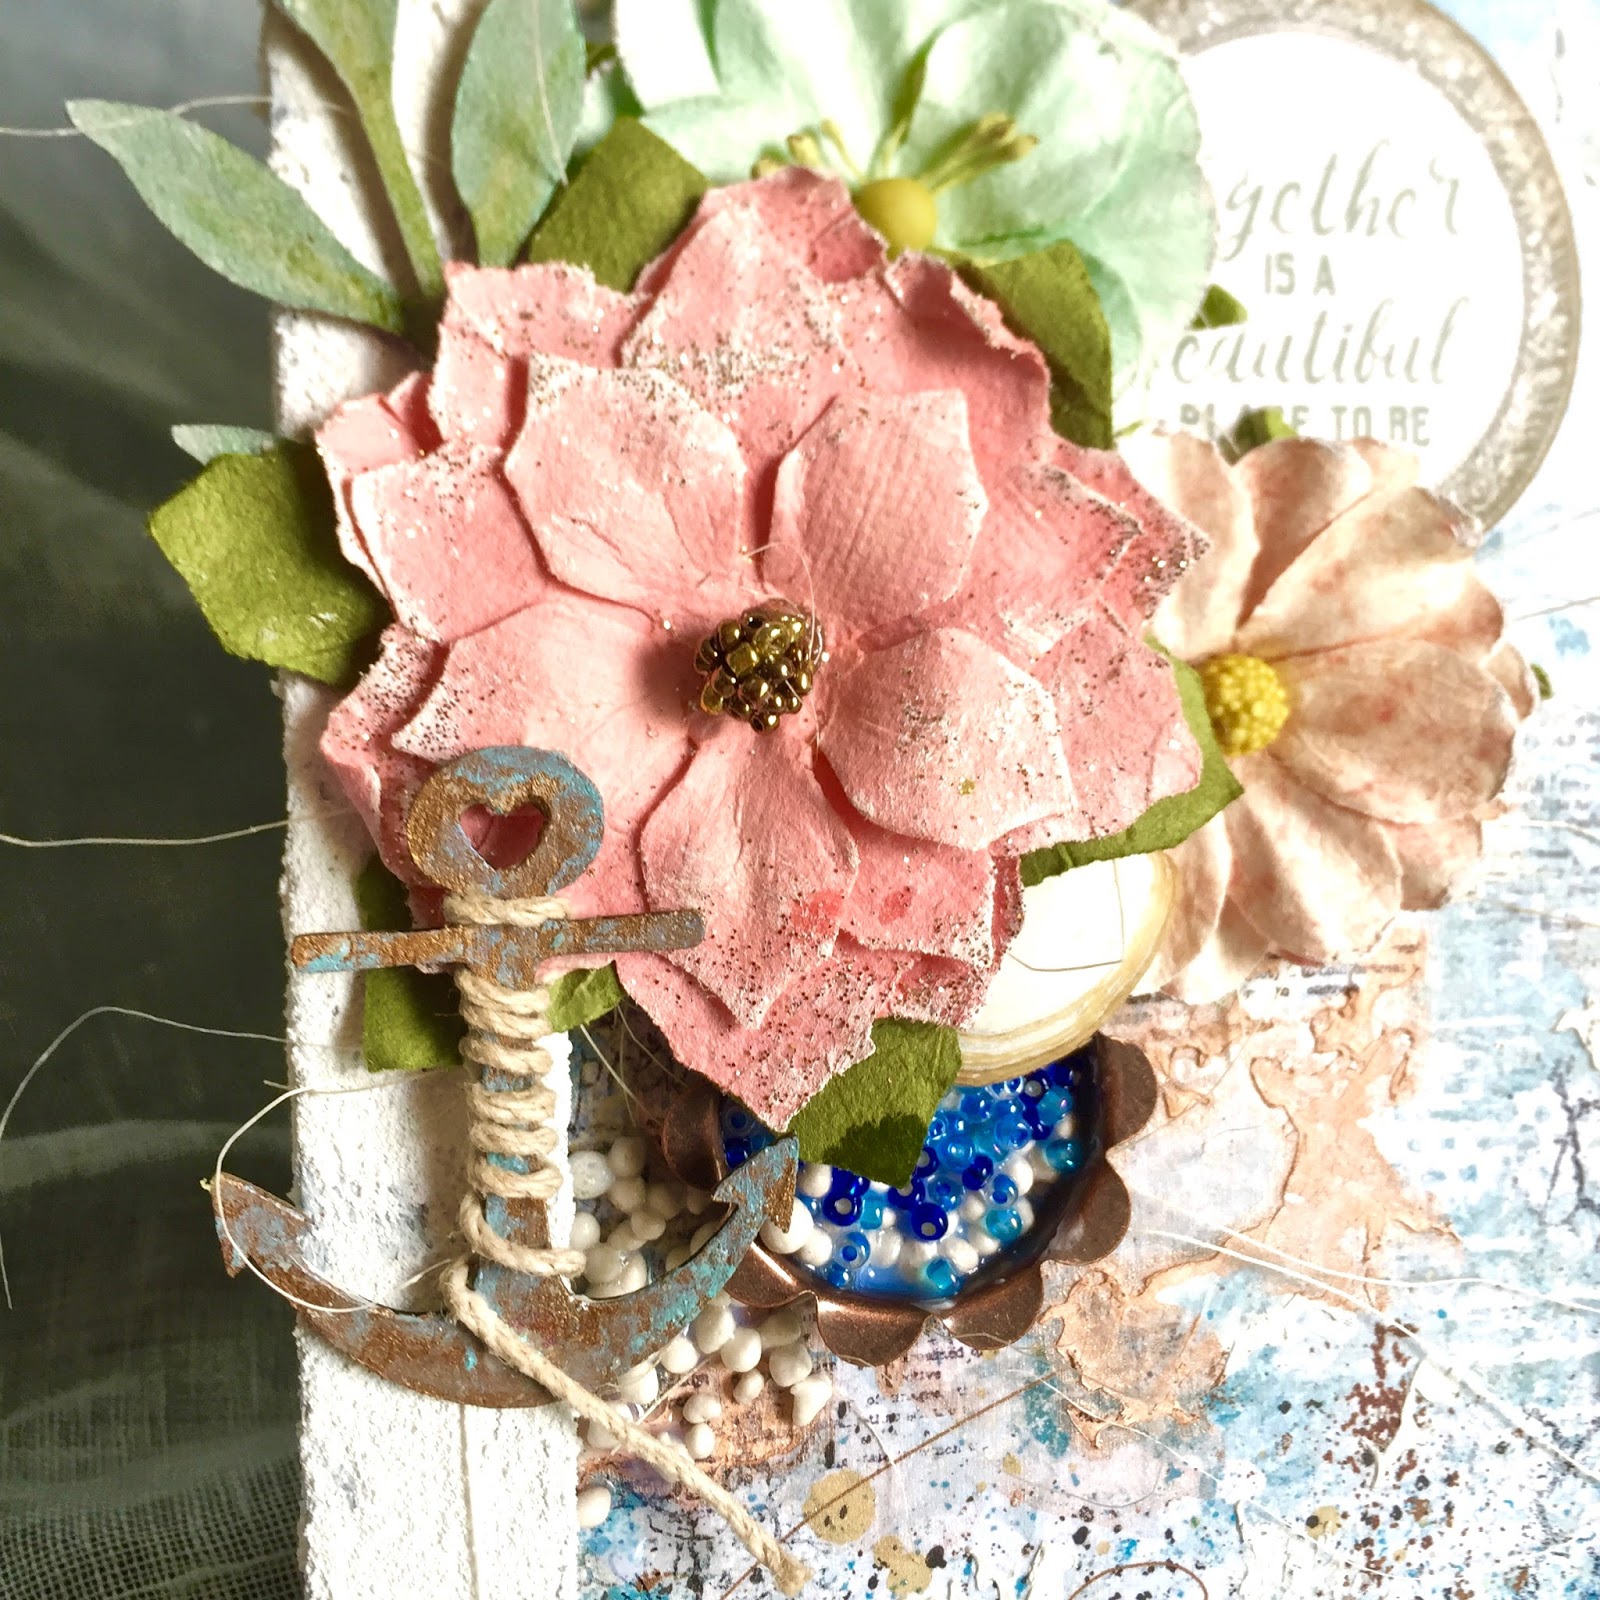

The background paper is from their new series of amazing background papers, aptly called Artisan Collection and this particular set is named Happy Accident. Happy days indeed because papers like these are perfect for lots of mixed media background work with their neutral tones and subtle details. For my project, I had a very simple stencil to match the splatter patterns on the paper, painted over with Distress Stain in Antiqued Bronze to give a nice shimmer.

I had a little anchor from Blue Fern Studios which I painted over with Copper metallic paint from Prima's mixed media range of products, and dabbed over with their Patina paint to create a distressed and weathered look. For the chipboard leaves, I first painted over with Prima's metallic watercolor palette before going over Distress Paints in Shabby Shutter and Distress Crayon in Peeled Paint, giving me a very dimensional but well-blended effect.


This chipboard from Blue Fern Studios had a lot of work done on it as well. The bits with shells had first script stamped embossed with dark blue embossing powder, followed by painting over with Prima's Opl Magic paint in blue/gold. The seaweeds were painted the same way as the other leaves chipboards, but for the flowers I had used Distress Crayon in Spun Sugar, and the chain bits with Copper metallic and patina paints. Phew, that's a lot of painting and mixing around different stuff!

I also tucked in a lot of ephemera from Kaisercraft (these pretty die cuts are just right for layering, accenting and filling out your projects) as well as some hessian I found in my kit. Fabric is a wonderful material for layering and adding a special bit of texture. 


Another seashell bit chipboard that I altered with liquid pearls. This dimensional paint is so useful - I can use it to create pearls (duh, that's pretty obvious) but it is also wonderful to use as a shimmery paint with 3D effects like these. Pearl-fect for a shiny seashell!


I rarely use Thickers but the set that came in the kit was just so me - lightly distressed with a wonderful texture of rough glitter bits. It was just right for my title.


Filling in the gaps in the project with these cute little pebbles, also from Prima Marketing.

And that's all I have for today! You can find the list of supplies I used for this project below, and they can all be found at Made With Love.

Supplies used:

paper: Blue Fern Studios - Happy Accident
flowers: Prima Marketing Inc
Distress Crayon, Stain, Perfect Pearls: Rangers
acrylic paints: Prima Marketing Inc
chipboards: Blue Fern Studios
die cuts: Kaisercraft
alpha-stickers: American Crafts

Monday, March 20, 2017

Today with Made With Love

Hello friends, how are you?

It's the end of the school holidays now and we are all geared up for the second term of Primary One! I'm thankful that it's been a fun journey so far for eldest, not so fun for me as I juggle my part time work in digital marketing and managing these three wiggly monkeys!

But there's always time for crafting eh?

Today, I'm sharing a project I created with the lovely goodies from Made With Love. As usual, I will have a supply list at the end of this post, and remember - these gorgeous products and more can be found at MWL's store at 313 Somerset B2.

Here's the project I created with Bo Bunny's Petal Lane:


I love the set of papers DT coordinator Aida has packed for me, and they are just perfect for a LO of my little girl. As I went through them and saw the black piece with the polka dots, I knew I had to do something high contrast - which is quite suitable for this little girl who is so different from her brothers.

My background was done with first embossing white embossing powder after using a script stamp on the paper. It acts as a resist when I subsequently put the paint on.

What I got in the kit was a set of acrylic paint from Dina Wakeley and I love these. Really intense and bright colors to spruce up your projects. Now the colors were a bit strong for the softness of the papers, so instead of splashing everything on with a brush, I used a sea sponge to apply. The result is a lovely sandy look which resembles dandelions in the air. I started with the Magenta, mixed in some white for a light pink shade. The yellow I used last just as an accent. This is what the sea sponge I used looked like:


Now I love Blue Fern Studios' chipboards and they are also available from MWL. I've used a doily here which I first embossed with white embossing powder. Followed by a coat of the amazing metallic wax from Prima Marketing. The texture is smooth and I applied it with my fingers. To remove, just gently wash your hands with soap. I love the effect it had on my EP, as well as on the metal bits.


More close-ups below:


In the floral cluster, I had white roses which I painted on with the left overs of my paint for the background. Don't waste the good stuff!

That's all I have for today, catch you again soon!

Supply list (available from Made With Love):
papers: Bo Bunny - Petal Lane
flowers: Prima Marketing Inc
paint: Rangers' Dina Wakely
embellishments: Prima Marketing Inc
chipboard: Blue Fern Studios

Sunday, January 22, 2017

Altered Fun with Made With Love

Hello Friends! and welcome to 2017!

The year is off to a quiet start for me as we prepared for eldest's first year of formal education and it has been quite fun so far. Always nice to have a break and finally spend some time creating stuff in my art room. Today, I'm on the blog for Made With Love and I have a cute altered pouch that took me just under 2 hrs to make.


We had a combined church service on the first Sunday of the year and the kids had various stations they could go to for activities instead of the usual Sunday school program. Eldest brought back this fabric pouch that had only his name stamped on it - he didn't know what else to do with it, so it was up to mummy to have some fun with it.

I had covered the fabric pouch with gesso before using some modeling paste over a floral stencil. Once that is all dried, I had me a bit of fun with the Distress Spray in Antique Linen. Using this color, I ended up with a soft, vintage look with which I could slowly build up on.

More details in the close-ups:


To create a soft palette, I gently brushed Distress Stains in Bundled Sage and Tattered Rose over my original layer of Antique Linen Spray. The resulting effect was a sweet pastel-like background without looking at all patchy and forced. On top of that, I did some stamping with some botanical themed stamps. I also added some fine details with Liquid Pearls for a feminine touch.


I saw some Grit Paste from Ranger's at the store and I knew I had to use them somewhere. So on to this huge piece of vine chipboard from Blue Fern Studios it went, which I had colored with Bundled Sage Distress Stain.


Lots of fussy cutting from the Kaisercraft Cherry Tree Lane collection. Just love the bouquets and colors of this collection! I had also mixed in some die cut pieces from the Be-you-tiful collection.


More bits and pieces to layer up.

Supplies used (available from Made With Love at 313 Somerset):

paper, die cuts: Kaisercraft
spray, stains, grit paste: Ranger's Distress spray, Distress Stain, Liquid pearls
flowers, stencil, chipboard stickers: Prima Marketing Inc
chipboard vine: Blue Fern Studios

Sunday, December 18, 2016

Christmas Memories with Made With Love

Hello friends!

Can you imagine? Just 7 more days to Christmas! Time has passed by so fast that the year has been just a blurry of faces and places. Thank God for cameras that we can capture those moments to remember by!

Today, I'm on here to share a Christmas layout I created for my LSS Made With Love, using the amazing supplies that can be found at their store.


I had chosen a light and neutral paper from the Kaisercraft Christmas Wishes collection for my background paper as I wanted to use Distress Stains to create the color washes. I had a mixture of splashes (created by forcefully slamming down the tube of Distress Stains on its dabber) and washes (created by using water to dilute the paint). The brush strokes of the clear gesso applied to the background paper before the mediums were added lent a grungy look. I also had stenciled UTEE-embossed stars under all the Stains, resulting in little resist patterns all over.

More details in the close-ups:


Gold-foil words and die cuts as my embellishments. Also added in are Tree Toys chipboard (altered with embossing powder and Distress Glitter) from Blue Fern Studios and sequins from my own stash.


More Gold-foil words. These are a real treat to add to any layout! I also tucked in fussy cut poinsettias, another Blue Fern Studios chipboard (altered with embossing powder and Distress Glitter) and a wooden clock into my cluster.


Some sweet flowers and an epoxy sticker. You can see some of the finer background details like the different stamps I had used.


A lovely metal tag from Tim Holtz to top up the sentiment, nested on a bunch of sweet Christmas flowers from Prima Marketing.

List of supplies (available from Made With Love):

paper: Kaisercraft
gold foil die-cuts: Kaisercraft
Distress Stains, Distress Glitter: Ranger's
Embossing powder: WOW!
chipboard: Blue Fern Studios
metal piece: Tim Holtz
flowers: Prima Marketing Inc.

Thanks for joining me today, and have a Merry Christmas!


Thursday, November 3, 2016

Memoires with Blue Fern Studios

Hello friends! 

Today is my turn on the Blue Fern blog and I'm excited to be showing you a couple of projects I've created with the beautiful new collection by Michele!

This collection had me digging up old photos from the attic. My first layout is one of my folks when they were on their honeymoon.


Keeping the background really toned down because of the details in the paper that I wanted to show.

Close-ups:


Mesh bits chipboard which I had altered with Clover and Grassy Knoll embossing powders.I also fussy cut an element from Calling Cards which made a lovely addition to this floral cluster.


Another cluster with the other half of the Mesh Bits chipboard, layered over another fussy cut from Calling Cards and a bit of the Cuckoo Clock chipboard.


The Cuckoo Clock chipboard which I painted with copper metallic paint and added a couple of shiny bits on.


My title piece which I altered with Copper, 14 Karat and Antique Gold EP.


My second project is a video tutorial which I had created with also papers from the Memoires collection. This features a photo of my dad and me on a holiday trip.


A fair bit more details in the background as the paper was suitable for some playing around with. I also deliberately chose the Daisy Collage chipboard to match the paper because of the brick motif.


The clock piece from Cuckoo Clock chipboard, of which the main clock was used in the first layout. I also used Late Winter Lilies throughout the layout because they added so much softness to the page.


Sparkly antique feel created for the Ever After Frame.


Daisy Collage tucked between the paper layers.


More of the Daiy Collage.

You can view the creative process in this video:


Monday, September 19, 2016

September Inspirations with Made With Love


Hello friends! Hope all are well with you guys!

Today I am sharing a project I created for my LSS Made With Love with some gorgeous supplies from their store at 313 Somerset. It's been awhile too since I did a tutorial for them, so here is a photo step-by-step to show you how I created this canvas.


1. Prime the canvas with gesso. 


2. When the gesso has dried completely (important!), create some texture on your background using UTEE powder, a stencil and some embossing glue. Use a heat tool to melt the UTEE powder.


3. Layer papers to create your main cluster. 


4. Prime your chipboard with gesso. Create a resist pattern with a stamp, white embossing powder and embossing glue.


5. Color it with Distress Stains, using water to blend. 


6. Ink the sides too to make it pretty.


7. To color the background, I'm using Tim Holtz Distress crayons. These are so fun to work with!


8. I spread out the colors in the order they came in, like a mini-rainbow.


9. Using baby wipes, I activated the pigment into paint and could control the intensity and blending between each color very well. 


10. Ta-da! Add more interest with stamps.


And this is the finished canvas after I added more stuff. It's my eldest boy's first birthday and a family photo we took. I'm planning to make a gift of it for my in-laws during Christmas. 

Details in the close-ups:


Altered chipboard from Blue Fern Studios


Background details showing the UTEE powder, Distress Crayons and stamping at work.


Cute whimsical title


And here are the supplies I used from Made With Love:

papers - Bo Bunny (Double Dot Design), Echo Park (I Love Family)
chipboard - Blue Fern Studios
mediums - Prima Marketing Inc (gesso); Distress Crayons (Tim Holtz); UTEE powder, Embossing powder, embossing glue, archival ink (Ranger's)
title sticker: Thickers
stamps: Prima kareting Inc, Kaisercraft
stencil: The Crafter's Workshop

Saturday, September 3, 2016

Seaside Memories with Blue Fern Studios

Hello friends, how are you?

September is now upon us, and the weather here is becoming a little cooler with more rain. But I'm still very much in a summer mood because of the Seaside Cottages collection. Today I'm here to share two more creations with you. 


This has to be one of the simplest layout I have made in a long time with just splashes of paint in the background because the paper is too pretty to cover up. The photo is one of my boys on the day we landed in Okinawa after a really long flight. We had made our way to a sea salt factory and the view out is just amazing, with the sun starting to set.

Some details:


The Seaside Charms chipboard, which I had painted with gold acrylic paint and covered with a layer of crackle paint. 


My title piece which I had embossed with Breeze and Sky Blue embossing powders.


The top half of the Seaside Charms chipboard which I had snipped off.


My second share is another layout of my second boy when he was a baby. I love how the colors of the photo matched the background paper Embark so perfectly that I built the whole layout around this.

Details here:


Altered seashell and anchors matched with the seaside lilies.


My title piece


Fussy cut details


Mesh bits chipboard tucked behind my photo


More chipboard goodies!

And here is the start to finish video of how I put this layout together:


Thanks for dropping by!