Showing posts with label altered. Show all posts

Sunday, June 25, 2017

Always Remember with Made With Love

Happy Sunday friends!

How are you doing on this long holiday weekend? I am taking in a lot of lovely smells of rendang from my neighbourhood as our Malay friends here celebrate their festival, at the same time the two younger ones as they have both chosen to fall sick at the same time. But nothing to make myself feel better than to share about some lovely products I've been using recently!

I got a HUGE wooden thickboard tag from Stampers Anonymous in my DT kit for Made With Love some time back, but had completely forgotten to use it. Well, I found it again while packing up my room and thought it will be perfect for a nice shabby project. 


And what speaks shabby and grunge more than Blue Fern Studios' Artisan collection of papers? I'm using Happy Accident here, and instead of the usual cut and paste, I've done gel transfer for the background. It's lovely how the designs seem to blend and fuse into the thickboard itself. You can see here for a tutorial of the gel transfer background technique. Then I took some Tim Holtz Ideology tissue paper and added it for some relief and details.

More details in the close-ups:


In my kit was the Prima Marketing Artisan Powder (designed by Frank Garcia, one of my favourite scrapbookers). It's a pretty amazing thing and I've used it 3 ways here - dusting it as a pigment on my flowers and fabric trim, using it as a distress color on the edges of my tag and mixing it with gel as a tinted medium I can use over my stencil. 


I like to use chipboards in my projects and here is no exception. The wildflower chipboard was first colored with Peacock Feathers distress paint, followed by Shabby Shutters and some dabs of Dina Wakely's acrylic paint in Elephant. Then was a layer of crackle paste from Prima and lastly, a watered down layer of the acrylic paint in Medieval to bring out the cracks. The mushroom chipboard showed the exact same colors except without the crackle.


For my title, I used Dina Wakely's acrylic paint in Gilt to cover the entire piece. What I like about this paint is its rich colors and how easy it is to work with. The small bottles come with a handy fine-tip applicator so you don't end up over dispensing too much paint and waste that good stuff. 


A little bit more of some metal bits I've painted over with Prima's acrylic paint in Patina. 


And that's all I have for you today. Enjoy your day ahead!


Monday, May 15, 2017

Family with Made With Love

Hello friends! What a wet Monday in May! It's supposed to be all bright and hot and sunny in Singapore now but the weather's been so funny. Well, can't complain because I love cool weather.

In fact, that was what we had on our trip to Melbourne last spring - albeit too cold for comfort. But oh, so many wonderful memories and today, I've finally scrapped our family photo from that trip for my DT project for Made With Love.


Family photos go on display on the counter by the main door, so it has to be something really sturdy. I used an IKEA photo frame as a base, and the rest of the supplies are from the awesome kit that Aida packed for me. And the kit has all my favourite Blue Fern Studio goodies! Although I have left their DT after 3 wonderful years, BFS products always get my mojo going - and the best is they are available from Made With Love - in Singapore!

For the picture frame, I prepped it with Dina Wakely's white gesso followed by grit paste from Ranger's. This added to the beach/ocean feel that I wanted to create in the project.

More details in the close-ups:


The background paper is from their new series of amazing background papers, aptly called Artisan Collection and this particular set is named Happy Accident. Happy days indeed because papers like these are perfect for lots of mixed media background work with their neutral tones and subtle details. For my project, I had a very simple stencil to match the splatter patterns on the paper, painted over with Distress Stain in Antiqued Bronze to give a nice shimmer.

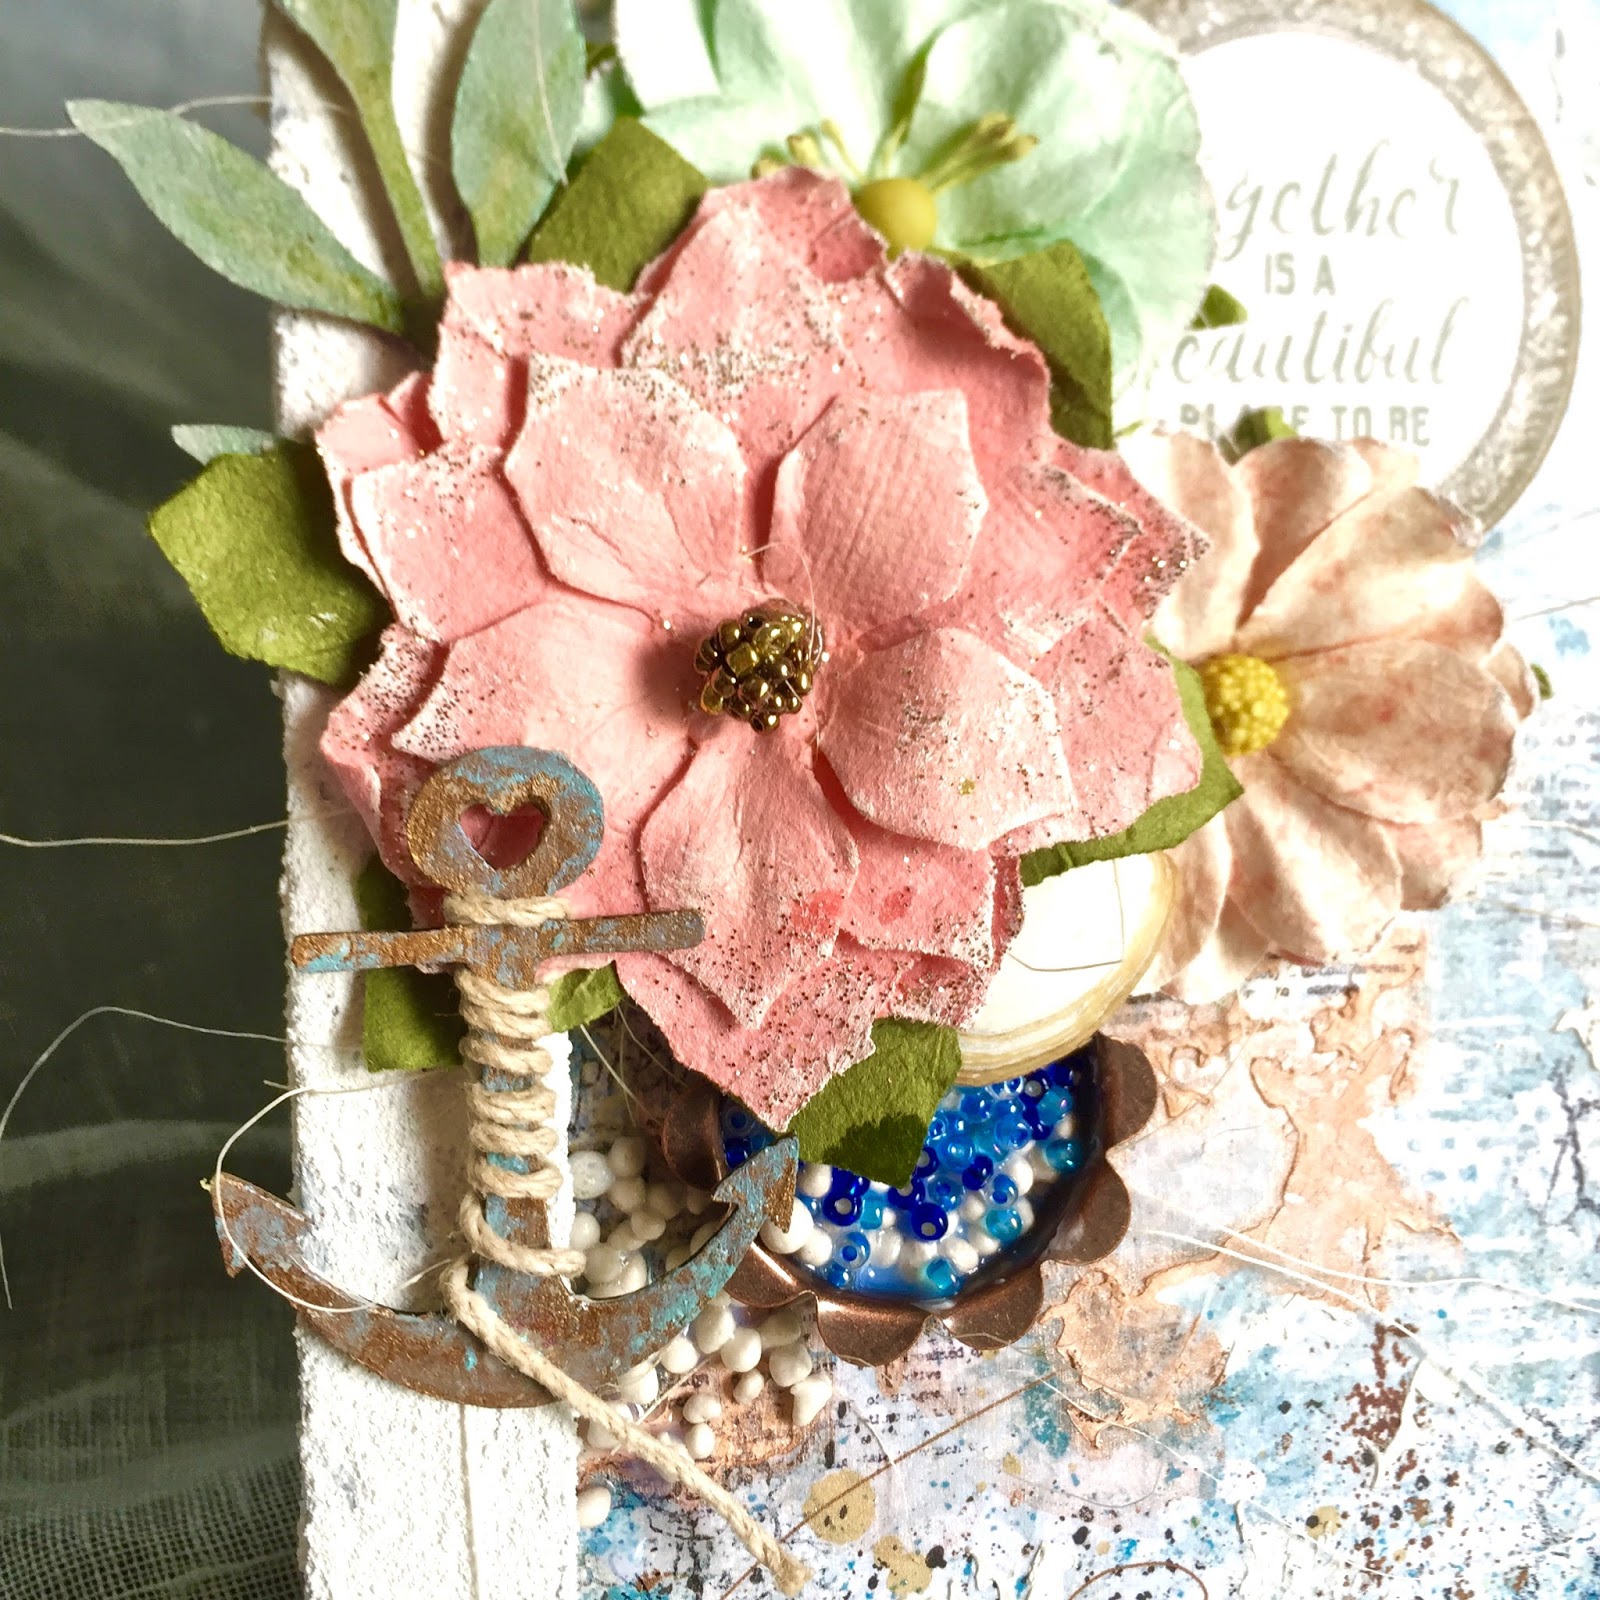
I had a little anchor from Blue Fern Studios which I painted over with Copper metallic paint from Prima's mixed media range of products, and dabbed over with their Patina paint to create a distressed and weathered look. For the chipboard leaves, I first painted over with Prima's metallic watercolor palette before going over Distress Paints in Shabby Shutter and Distress Crayon in Peeled Paint, giving me a very dimensional but well-blended effect.


This chipboard from Blue Fern Studios had a lot of work done on it as well. The bits with shells had first script stamped embossed with dark blue embossing powder, followed by painting over with Prima's Opl Magic paint in blue/gold. The seaweeds were painted the same way as the other leaves chipboards, but for the flowers I had used Distress Crayon in Spun Sugar, and the chain bits with Copper metallic and patina paints. Phew, that's a lot of painting and mixing around different stuff!

I also tucked in a lot of ephemera from Kaisercraft (these pretty die cuts are just right for layering, accenting and filling out your projects) as well as some hessian I found in my kit. Fabric is a wonderful material for layering and adding a special bit of texture. 


Another seashell bit chipboard that I altered with liquid pearls. This dimensional paint is so useful - I can use it to create pearls (duh, that's pretty obvious) but it is also wonderful to use as a shimmery paint with 3D effects like these. Pearl-fect for a shiny seashell!


I rarely use Thickers but the set that came in the kit was just so me - lightly distressed with a wonderful texture of rough glitter bits. It was just right for my title.


Filling in the gaps in the project with these cute little pebbles, also from Prima Marketing.

And that's all I have for today! You can find the list of supplies I used for this project below, and they can all be found at Made With Love.

Supplies used:

paper: Blue Fern Studios - Happy Accident
flowers: Prima Marketing Inc
Distress Crayon, Stain, Perfect Pearls: Rangers
acrylic paints: Prima Marketing Inc
chipboards: Blue Fern Studios
die cuts: Kaisercraft
alpha-stickers: American Crafts

Sunday, January 22, 2017

Altered Fun with Made With Love

Hello Friends! and welcome to 2017!

The year is off to a quiet start for me as we prepared for eldest's first year of formal education and it has been quite fun so far. Always nice to have a break and finally spend some time creating stuff in my art room. Today, I'm on the blog for Made With Love and I have a cute altered pouch that took me just under 2 hrs to make.


We had a combined church service on the first Sunday of the year and the kids had various stations they could go to for activities instead of the usual Sunday school program. Eldest brought back this fabric pouch that had only his name stamped on it - he didn't know what else to do with it, so it was up to mummy to have some fun with it.

I had covered the fabric pouch with gesso before using some modeling paste over a floral stencil. Once that is all dried, I had me a bit of fun with the Distress Spray in Antique Linen. Using this color, I ended up with a soft, vintage look with which I could slowly build up on.

More details in the close-ups:


To create a soft palette, I gently brushed Distress Stains in Bundled Sage and Tattered Rose over my original layer of Antique Linen Spray. The resulting effect was a sweet pastel-like background without looking at all patchy and forced. On top of that, I did some stamping with some botanical themed stamps. I also added some fine details with Liquid Pearls for a feminine touch.


I saw some Grit Paste from Ranger's at the store and I knew I had to use them somewhere. So on to this huge piece of vine chipboard from Blue Fern Studios it went, which I had colored with Bundled Sage Distress Stain.


Lots of fussy cutting from the Kaisercraft Cherry Tree Lane collection. Just love the bouquets and colors of this collection! I had also mixed in some die cut pieces from the Be-you-tiful collection.


More bits and pieces to layer up.

Supplies used (available from Made With Love at 313 Somerset):

paper, die cuts: Kaisercraft
spray, stains, grit paste: Ranger's Distress spray, Distress Stain, Liquid pearls
flowers, stencil, chipboard stickers: Prima Marketing Inc
chipboard vine: Blue Fern Studios

Sunday, July 3, 2016

July Inspiration with Blue Fern Studios

Hello friends,

how have you been? Half the year has been gone and summer is now upon us! It has been such a great and fulfilling year so far and I'm really thankful for all the people that have come into my life.

For my blog post today on Blue Fern Studios, I have two projects to share with you using some of my favourite past collections.

First is a shadow box display which I intend as a gift to a dear friend. I've done something different this time in that, I went without my usual mixed media background but instead, focused on the Blue Fern papers and chipboards. I've been meaning to do this but couldn't find the right project to start off. The shadow box I found in my LSS was just perfect!

Here is the piece, created using Autumn Anthology papers:


I'm particularly drawn to this collection because of the beautiful shade of cobalt blue mixed with coral Michele used in the papers. If you know me by now, blue is one of my favourite colors and I can't use enough of it. It's a good thing I have two boys that I can use the color for! There are also plenty of images that I can fussy cut out from this collection and you can see that I wasted no time in doing just that.

Some details in the close-ups:


Love this hot air balloon! A little tea cup basket does remind me of the spinning tea cup ride at amusement parks in my childhood. I've dabbed some Sticklers on for a nice glittery effect.


Chained Bits and Berry Stems chipboard which I had altered with Imagine Ink embossing powders.
For Berry Stems, I first painted with some shimmery watercolors before using Grassy Knoll EP randomly. For Chained Bits, I first used Auburn EP, followed by Mushroom and Buttercup EP before topping it off with Copper Glitter.


Using the Marseille Frame here, which fit the display perfectly. I first covered it with copper metallic paint before brushing on clear crackle paint for extra texture.


A Flutter Page Dangle which I had snipped up. I first colored it with Gelato, then stamped and embossed with Cotton Candy and Watermelon EPs.


A flower which I altered with glitter in Sunshine and Dusty Pink.


Blue Fern Studios products used:

paper: Autumn Anthology - Le Ballon, Balcony, Calling Cards
chipboard: Marseille Frame, Berry Stems, Chained Bits, Flutter Page Dangle
Imagine Ink: embossing powders - Grassy Knoll, Auburn, Mushroom, Buttercup, Cotton Candy, Watermelon
glitter - Copper, Sunshine, Dusty Pink

My second project is a layout using the Frolic collection. It matches the theme of my eldest playing in the grass field. The bits of yellow and blue really brings out the mood of feeling the sun on my face on a cloudless day. 


Details in the close-ups:


A subtitle from Calling Cards. 


Whimsy Flourish which I had altered.


My title piece, altered with embossing powders and glitter.


Fussy cutting here


Looped Frames which I had altered with embossing powders and glitter.

And here is the start to finish video:


Blue Fern Studios products used:

paper: Frolic - Veranda, Calling Cards, Dans le Jardin
chipboard: Looped Frames, Whimsy Flourish, Glee
flowers: Tranquility Blooms
Imagine Ink: embossing powder - Seven Seas, In the Navy, Cerulean, Bonny Blue, Buttercup, Snow


glitter - Sunshine, Gulf Coast

There are also two new happenings on the blog this month!

Firstly, we have a new activity for all you wonderful people to take part in. Instead of our monthly challenge, we are starting a new giveaway where YOU tell us what you would like to see in our new designs. They can be word phrases or one single word. The winning entry will have a pack of Blue Fern goodies delivered to their door step! More details here.

Secondly, BFS is releasing a new paper collection and I'm super, super excited about this one because it's my first love - the sea!

Check out Seaside Cottages:


I'm going giddy just thinking of all the photos I'm going to scrap, the mini-albums, the canvases.... This has to be my new favourite!

For the full reveal, as well as co-ordinating flowers, chipboards and mediums, visit our blog!

Monday, June 13, 2016

Life is Wonderful with Made With Love

Hello friends, how are you?

The June holidays are in full swing and I hope the kiddos are having fun enjoying their break from school. For mummies and daddies, this means no more waking up early to send the kids to school, and vacay, vacay, vacay! Looking at all the vacation photos on my Facebook newsfeed, I can't wait for our family holiday to quickly come. But first, today's share for my LSS!

This one had me dumbfounded for awhile because I don't want to create a layout, and I didn't have enough time for a mini-album. I had run out of small canvases and I was just standing like a fool in my scrap-room pulling out drawers and hoping to find inspiration in there. And lo and behold, I spied these wooden resin holders from Prima which I had kept aside until I had found a purpose for them. And they came to my rescue!


This is a home display piece I created from one such wood resin holder. I might have mentioned before I love wood grain texture so this was a pleasure to work with. I first primed the whole piece with gesso so that the acrylic paint would not soak into the wood and become un-usable. I had gone for the Tiffany Blue look with the Art Alchemy Light Patina Metallic Acrylic paint. The metallic sheen is quite subtle here, but under the light it's just gorgeous.

More details in the close-ups:


Mixing and matching different Blue Fern Studios paper collections, something I havn't actually done before despite having so much of their papers at home! Here's a butterfly fussy-cut out from the Tranquility collection. I had dabbed some Sticklers on it for a shimmer.


A Dangle chipboard from Blue Fern Studios. I had first painted it with Steampunk Copper acrylic paint and sealed it with Rock Candy distress crackle paint for a really vintage look.


Lots of fussy-cut elements from Courtship Lane and Attic Charm papers, both from Blue Fern Studios. The title piece is from Kaisercraft's ephemera pack.


So I managed to get myself a woodgrain stencil (yes!) and although there wasn't a lot of space here to see it clearly, it's right there on the side of the wooden box.


A piece of Blue Fern chipboard (Layering Stem) peeking out from the side. I had painted it green with Tattered Angels Fairway and covered it with a layer of Iridescent Gold.

And that's all I have for you today. The supplies are all available from the Made With Love store at 313 Somerset B2, and here's the list below:

Mediums:

Prima Art Alchemy Acrylic Paint (Light Patina, Steampunk Copper)
Tattered Angels Mists (Fairway, Iridescent Gold)
Chipboards:

Blue Fern Studios (Deja Vu chippies, Layering Stems)

Patterned paper:

Blue Fern Studios (Attic Charm, Tranquility)

Flowers:

Prima Marketing Inc


Monday, April 25, 2016

Treasure Chest with Made With Love

Hello friends, how have you been?

Today I am up on the Made With Love blog with a small altered item to share with you, created with the new acrylic paints from Prima. 


The chipboard box is a nice little cutie from G45 which my DT co-ordinator Aida has kindly packed in for me, together with loads of yummy ephemera and trinkets for me to play with. Not to mention two jars of the new metallic acrylic paints from Prima Marketing!

Here are some close-ups:


Little tickets and trinkets which I had fun layering over a Blue Fern Studios chipboard. The chipboard was primed with black gesso and embossed with white EP. Then I used the silky smooth Opal magic acrylic paint from Prima (Blue-Gold) to paint over. As you can see, the embossed bits have a lovely blue-turquoise tinge while the rest is a stunning gold. I then highlighted with some Patina acrylic paint. The exterior of the box was primed with white gesso and had light paste stenciled over for a floral design. Then I painted a nice thick coat of Copper metallic acrylic over. 


Some fussy-cut frames and pictures from a sheet of Bo Bunny's Beautiful Dreamer collection, which I happily layered beneath the chipboard and resin. Everything was given a thin layer of Patina metallic paint.


The inside of the box - with a mini-tag album .


Some details on the tag album. The tags were covered with black gesso and had light paste stenciled over. Then I used the Opal Magic Blue-Gold paint over so you can see the different colors more clearly here.


Supplies used (available from Made With Love):

pp: Bo Bunny's Beautiful Dreamer
flowers: Prima Marketing
cardboard box: Graphic 45
mediums (Art Alchemy metallic paints - Steampunk Copper, Light Patina, Opal Magic Blue-Gold,  light paste): Prima Marketing
And that's all I have for today. Thanks for dropping by!

Tuesday, March 8, 2016

Discover with Made With Love

Hello friends!

I'm up on the Made With Love blog today with a funky mixed media project using some really cool new releases! This canvas is really out of my usual but it was a lot of creative fun. Who knows, I might turn this into a class....


This is a really dark and pensive piece but there's a good reason for using black gesso all over - I had the new Prima acrylic paint - Opal Magic Violet-Gold to play with and it was so much fun! Over a dark surface, it is a lovely gold but over a lighter surface, the luminescent violet peeks through.

Details in the close-ups:


Lots of textures here! Metals with chipboard (from Blue Fern Studios), stenciled graphite paste and beads and microspheres and distress glitter make everything a lot more interesting. Did you also spot the new Art Stones? Perfect for a funky look!


Here you can see the violet-gold more prominently and it's just sweet.


My title piece from Blue Fern Studios which I first embossed with black EP and painted the acrylic paint over. The violet is a lot more obvious here over the white gesso-primed chipboard.


More Mechanicals and textures.

Supplies list (available from Made With Love):

10x10 canvas board
Prima Mechanicals
Art Stones
Archival Cast
Opal Magic Violet-Gold acrylic paint
black and white gessos
Microbeads
Distress glitter
Graphite texture paste

That's all I have for today, have a great week ahead!

Jelissa


Thursday, October 15, 2015

Enjoying Outdoors with Maja Design


Hello Maja fans!

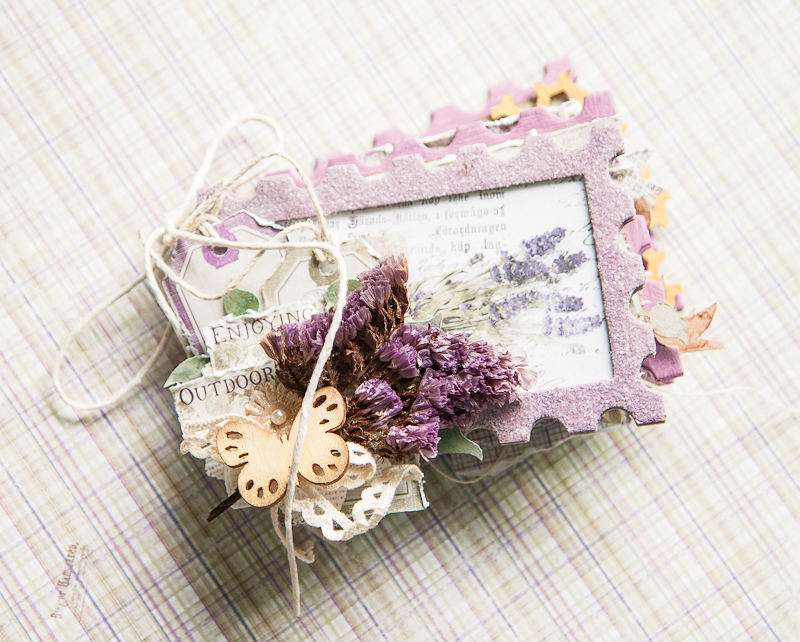
I'm on the blog today to share a mini album I've made from the brand new collection Enjoying Outdoors. I love the sweet combination of purples with browns and greens - and reminds me of the lavender fields we saw while on a road trip to the forests in Western Australia.


IMG_0258 
Here is the cover of my mini. I love the stalks of lavender in the die-cut sheet but lavenders don't grow well here, so I tied a small bunch of dried forget-me-nots (I keep lots of these whenever I receive a bouquet of flowers, which is not very often by the way!) with some lace. The die cut tags from the 6x6 paper stack are the perfect size for the mini too. 

Here's a look at the inside pages:

IMG_0261

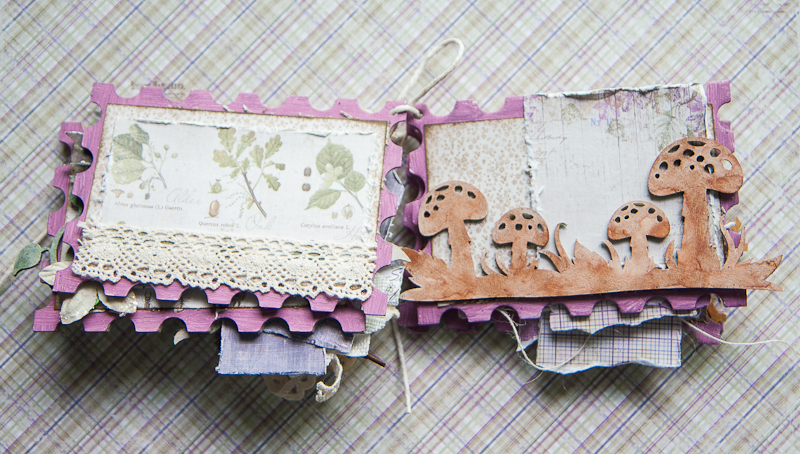
This is really a very small album - about 3" by 5" so I decided to keep things simple inside without excessive layers. Just lightly distressed edges on the papers and banners made from the info strip to give me plenty of space for photos and journaling.

IMG_0262 
A little more fun here with chipboard and lace. We always try to spot mushrooms on our walks in the park so I added those as a reminder of the little bits of nature we see when we're outdoors. Now if only there were truffles here.... 

IMG_0264

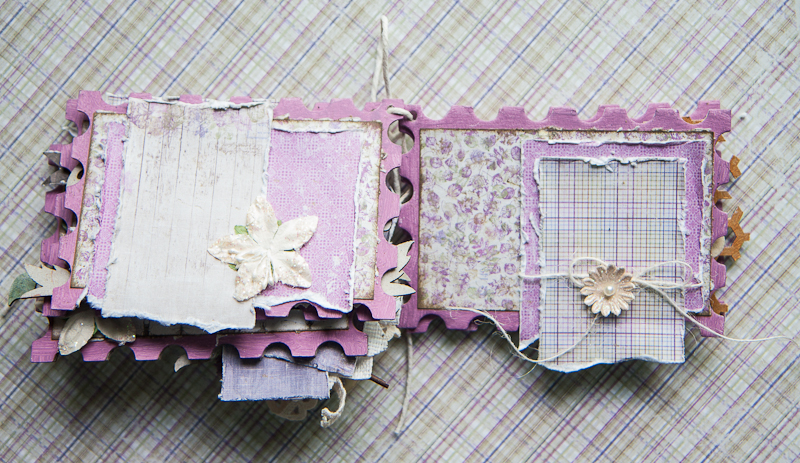
In the end, I couldn't resist adding more layers and flowers.

IMG_0265

And the last two pages of the album with simple photo mats and flat flowers so that the album doesn't end up too chunky.

That's all for the mini album and I hope to fill it up soon with pictures of our family out in the parks for our walks and the fun things that we see on the way!

love,
jelissa